Overview to Sterilize Your Derma Roller for Safe Use
Learning how to sterilize your derma roller before packaging is crucial for maintaining hygiene and safety. By following the steps outlined in the article, you can create a clean and sterile environment, choose the appropriate sterilization method, and properly handle the sterilized roller. This knowledge will benefit you by ensuring that your derma roller is free from harmful bacteria and ready for safe and effective use.
From preparing your workspace to selecting the right sterilization method, this article provides valuable insights from experts from derma roller companies into the best practices for sterilizing and packaging derma rollers. By following the guidelines and FAQs provided, you can confidently sterilize your derma roller with isopropyl alcohol, hydrogen peroxide, boiling water, or UV light, ensuring its safety and effectiveness for your skincare routine. Take the necessary steps to maintain the sterility of your derma roller and enjoy the benefits of a clean and hygienic skincare tool.
Key Points
- Prepare workspace for effective sterilization
- Choose appropriate sterilization method
- Sterilize derma roller with isopropyl alcohol
- Use hydrogen peroxide for effective sterilization
- Sterilize derma roller with boiling water
- Use UV light for thorough sterilization
- Properly dry and handle the sterilized roller
- Package the roller safely and hygienically
- FAQs about sterilizing and packaging derma rollers
Preparing Your Work Space for Sterilization
Prior to you begin the sterilization procedure for your derma roller, it’s essential to prepare your work space properly. A tidy and organized environment not only ensures effective sterilization but also reduces the risk of infection. Here are the crucial actions to prepare your workspace:
First, choose a location that is devoid of dirt and clutter. This should preferably be an area that is not often used for other tasks to preserve its tidiness. A well-ventilated area is also recommended to help dissipate any fumes from sanitation representatives.
Next, collect all the needed products and tools for the sterilization process. This consists of:
| Products | Objective |
|---|---|
| Isopropyl Alcohol | Decontaminating the derma roller |
| Hydrogen Peroxide | Alternative disinfectant |
| Boiling Water | Warmth sterilization |
| UV Sterilizer | UV light sanitation |
| Clean Towels | Drying the derma roller |
| Disposable Handwear covers | Securing against contamination |
Make certain that your office surface area is decontaminated prior to putting any type of instruments on it. Utilize an anti-bacterial clean or option to thoroughly cleanse the area. When the surface area is clean, outlined a clean towel or sterilized pad where you will place the derma roller and various other products.
Wearing non-reusable handwear covers is highly advised to avoid moving any kind of oil or pollutants from your hands to the derma roller. Before placing on the gloves, wash your hands thoroughly with soap and water, and dry them with a clean towel.
Finally, make sure that any type of containers or storage space units you prepare to use for the disinfected derma roller are additionally clean and disinfected. This consists of any type of trays, storage boxes, or packaging materials. By taking these preparatory actions, you develop a sterilized setting that contributes to effective and safe sanitation of your derma roller.
Choosing the Appropriate Sanitation Approach
When it comes to disinfecting your derma roller prior to product packaging, picking the proper approach is essential to ensuring the highest possible level of health and security. There are several sanitation methods readily available, each with its own advantages and limitations. Understanding these approaches will help you make an informed choice based on your particular requirements and circumstances.
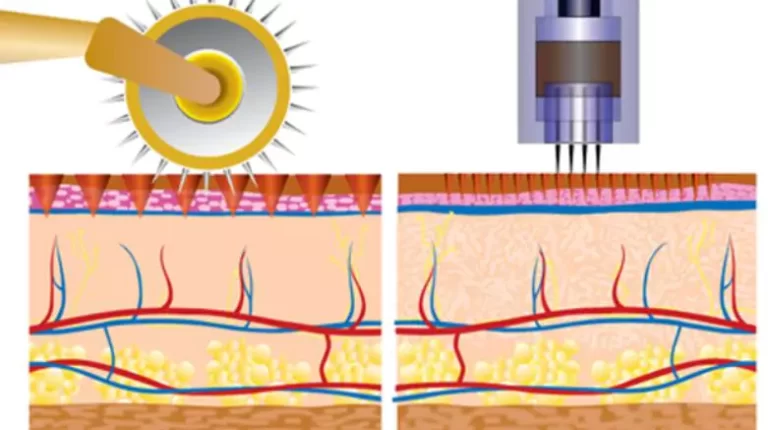
First, take into consideration the material of your derma roller. The majority of derma rollers are made from medical-grade stainless steel or titanium. These materials are durable and can hold up against numerous sterilization techniques; however, it is necessary to confirm the producer’s suggestions to stay clear of any type of potential damage.
Typically utilized sterilization methods include chemical anti-bacterials, such as isopropyl alcohol and hydrogen peroxide, and physical techniques, like boiling water and UV light. Each approach has its own set of considerations:
- Isopropyl Alcohol: This is an extensively obtainable and effective sterilizing agent. 70% isopropyl alcohol is commonly suggested for disinfecting derma rollers. It works by denaturing proteins and liquifying lipids, properly eliminating most germs, fungi, and viruses.
- Hydrogen Peroxide: An additional efficient chemical anti-bacterial, hydrogen peroxide can be utilized at a focus of around 3–6%. It works by creating free radicals that damage essential cell parts. This technique is suitable for those seeking a choice between alcohol-based options.
- Boiling Water: This is a basic yet reliable technique for decontaminating metal derma rollers. Steaming the derma roller for 5–10 minutes can kill most bacteria. However, guarantee that the derma roller is completely submerged and handle it meticulously to stay clear of contamination post-sterilization.
- UV Light: UV-C light is an effective sanitation technique that can destroy the DNA and RNA of microorganisms, making them non-active. This technique is optimal for those who like a non-chemical strategy, yet it needs a UV sterilizer device and appropriate handling to ensure all surfaces of the derma roller are exposed to the light.
In summary, choosing the appropriate sterilization technique for your derma roller relies on the material of the roller, the availability of sterilization agents or devices, and your personal choices. Each technique has its own benefits and can effectively sterilize your derma roller when used properly. Constantly adhere to the finest practices for taking care of and sanitation to maintain the integrity and hygiene of your derma roller.
Making Use Of Isopropyl Alcohol for Sterilization
Decontaminating your derma roller with isopropyl alcohol is an efficient and uncomplicated method. To guarantee optimum results, adhere to these steps meticulously.
Choosing the Right Isopropyl Alcohol
It is important to choose an isopropyl alcohol option with a focus of at least 70%. This focus works in killing germs, infections, and fungi.
Preparing the Derma Roller
Prior to sanitizing, make certain your derma roller is thoroughly cleansed to remove any particles or deposits. Wash it under warm water and use a light soap if essential. Rub it dry with a clean paper towel.
Actions for Sterilization
| Action | Action |
|---|---|
| 1 | Pour isopropyl alcohol right into a tidy container, ensuring there is sufficient to totally immerse the derma roller head. |
| 2 | Place the derma roller head right into the container, guaranteeing it is completely covered by the alcohol option. |
| 3 | Permit the derma roller to soak for at least 10–15 minutes. This period makes sure that any kind of unsafe bacteria is effectively eliminated. |
| 4 | After saturating, remove the derma roller from the alcohol and place it on a clean, dry surface. |
| 5 | Allow the derma roller to completely dry before handling it further. |
Making Certain Safety, Security and Tidiness
While taking care of the isopropyl alcohol and the derma roller, it is essential to utilize tidy gloves to avoid contamination. Also, guarantee that the work area is clean and devoid of impurities.
As soon as the derma roller is completely dry, it awaits safe and sanitary packaging. Handle it with clean devices or handwear covers to maintain its sterility.
Sanitizing Your Derma Roller with Hydrogen Peroxide
Sterilizing your derma roller with hydrogen peroxide is a reliable technique to guarantee it is free from dangerous microorganisms and impurities before product packaging. To begin, prepare a clean and well organized work space to avoid any kind of cross-contamination during the sterilization process. Guarantee you have a container of 3% hydrogen peroxide, which is generally sufficient for this function.
Start by extensively rinsing your derma roller under warm running water to eliminate any type of noticeable debris or deposit. This initial cleaning step is critical as it helps boost the efficiency of the hydrogen peroxide. When rinsed, gently drink off any kind of excess water and place the derma roller on a tidy, dry paper towel.
Next, put enough hydrogen peroxide right into a tidy container to completely submerge the derma roller. Thoroughly place the derma roller into the container, ensuring that the roller head is totally immersed in the option. Permit it to soak for at least 10–15 minutes. This duration is usually adequate for the hydrogen peroxide to pass through and disinfect the micro-needles and the roller head.
After saturating, get rid of the derma roller from the hydrogen peroxide and wash it extensively with clean and sterile water to get rid of any kind of recurring peroxide that could continue to be. It is essential to ensure that all traces of hydrogen peroxide are rinsed to avoid any type of potential skin irritation throughout future use.
As soon as it is washed, put the derma roller on a tidy, sterile surface area or a fresh paper towel to air completely dry. Avoid utilizing towel towels or any products that may introduce brand-new contaminants. Proper drying out is vital to protect against the growth of bacteria and various other microbes that grow in moist environments.
By adhering to these actions thoroughly, you can successfully disinfect your derma roller using hydrogen peroxide, guaranteeing it is secure and prepared for packaging.
Utilizing Boiling Water for Reliable Sterilization
Boiling water is a reliable and widely available method for sanitizing your derma roller before packaging. This procedure ensures that most microorganisms, viruses, and other microbes are effectively removed, offering a risk-free and sanitary device for your skin care regimen. Below’s a step-by-step overview to using boiling water for sterilization:
Step-by-Step Process
Step 1: Start by thoroughly cleansing your derma roller with warm water and a light soap. This step eliminates any debris or raw material that could conflict with the sterilization procedure.
Step 2: Fill a pot with enough water to totally submerge the derma roller. Place the pot in the oven and bring the water to a rolling boil.
Step 3: Once the water is steaming, meticulously place the derma roller right into the pot. Use tongs or a similar tool to prevent burns and make certain the derma roller is completely submerged.
Step 4: Boil the derma roller for at least 10–15 minutes. This duration is important as it ensures the boiling water can successfully kill most microorganisms existing on the tool.
Step 5: After boiling, utilize sanitized tongs to remove the derma roller from the pot. Place it on a clean, dry towel to cool down and dry completely. Make sure the derma roller is not touched by bare hands or any type of non-sterile surface areas throughout this process.
Crucial Factors to consider
When using boiling water for sanitation, it is very important to consider the following:
| Factor to consider | Information |
|---|---|
| Boiling Period | minimum of 10–15 minutes to ensure effective sanitation. |
| Water High quality | Use clean, safe, and clean water to avoid contamination. |
| Taking care of Tools | Use disinfected tongs to take care of the derma roller to maintain sterility. |
| Drying Refine | Permit the derma roller to air completely dry on a clean towel, making certain there is no contact with non-sterile surface areas. |
By following these steps and considerations, you can properly use boiling water to sanitize your derma roller, guaranteeing it is safe for usage and ready for sanitary product packaging.
Executing UV Light To Sterilize Your Derma Roller
Utilizing UV light to sterilize your derma roller is an efficient method. Ultraviolet (UV) light is understood for its ability to eliminate germs, viruses, and other microorganisms by disrupting their DNA, which prevents them from reproducing. This technique is extensively used in laboratory settings for its dependability and thoroughness.
To start, ensure you have a dedicated UV sterilization box or chamber specifically made for little instruments. These tools are available from numerous producers and feature instructions on their proper use. It’s necessary to adhere to these guidelines meticulously to attain ideal results.
Prior to placing the derma roller right into the UV sterilizer, it’s critical to execute a preliminary cleaning. This entails rinsing the roller under warm water to eliminate any visible debris and then soaking it in a solution of light soap and water. After saturating, wash the roller completely and permit it to air dry entirely. This step makes sure that the UV light can effectively get to all surfaces of the derma roller.
Once the derma roller is tidy and completely dry, place it inside the UV sanitation box. Position the roller to make sure that all parts are exposed to the UV light. Depending on the particular gadget, the sanitation process can take anywhere from a few minutes to over an hour. Refer to the supplier’s standards for the proper period.
Throughout the sanitation process, prevent opening up the UV box, as this can interrupt the cycle and reduce efficiency. After the advised time has actually elapsed, very carefully get rid of the derma roller using clean hands or sterile handwear covers to maintain its sterility.
It is very important to deal with the sterilized derma roller with treatment. Place it on a clean, sterile surface or straight into its packaging to stop contamination. Using UV light for sterilization not only guarantees that your derma roller is free from unsafe microbes, but it also expands the device’s life by preventing harsh chemicals that can trigger damage over time.

Correctly Drying Out and Dealing With the Sterilized Derma Roller
After completing the sanitation process, it is vital to guarantee your derma roller is completely dried out prior to handling and packaging it. Appropriate drying out stops the growth of germs and maintains the tool’s sterility. Below are the steps to comply with:
Step 1: Air Drying: Place the sanitized derma roller on a tidy, sterile surface area, such as a medical-grade paper towel or a sterilized tray. Permit it to air-dry completely. This procedure can take anywhere from half an hour to an hour, depending on the ambient moisture and temperature.
Step 2: Using Sterilized Materials: If time is essential, you can use a sterilized, lint-free fabric to carefully pat the derma roller dry. Guarantee the fabric is devoid of any kind of impurities to avoid reintroducing microorganisms.
Step 3: Staying Clear of Direct Handling: Minimize direct contact with the derma roller once it is decontaminated. Use decontaminated handwear covers or clean, sterile tongs to deal with the derma roller to preserve its sterility.
| Drying out Approach | Time Required | Precautions |
|---|---|---|
| Air Drying | 30-60 minutes | Guarantee a clean and sterile surface is made use of |
| Utilizing Sterilized Towels | 5-10 minutes | Use only lint-free, sterile fabrics |
Step 4: Appropriate Storage Space Prior To Product Packaging Once the derma roller is dry, place it in a clean and sterile container or tray to avoid contamination. It is necessary to package the derma roller as soon as possible after drying to maintain its decontaminated state.
Step 5: Last Inspection: Prior to packaging, evaluate the derma roller for any kind of recurring dampness or pollutants. Only proceed with product packaging if the derma roller is entirely dry and tidy.
Packaging Your Sanitized Derma Roller Securely and Hygienically
After ensuring your derma roller is extensively disinfected, the next vital step is to package it safely and hygienically. Appropriate packaging is crucial to maintaining the sterility of the derma roller and securing it from infection prior to use. Right here are the steps to guarantee your derma roller continues to be clean and sterile till it gets to the individual.
1. Picking Sterile Packaging Materials: Choose packaging materials that are sterile and appropriate for medical-grade gadgets. Usual options consist of sterile bags or sealed plastic containers. Make certain that the product packaging material is intact and devoid of damages that could compromise sterility.
2. Wearing Sterile Rubber Gloves: Prior to dealing with the sterilized derma roller, place on a set of clean, sterile gloves. This avoids any contamination that could move from your hands to the gadget. Adjustment handwear covers regularly if you touch non-sterile surface areas.
3. Making Use Of Sterilized Tools: Utilize clean and sterile tweezers or tongs to manage the derma roller. Avoid direct contact with the device to maintain its sterility. Area the derma roller delicately into the sterile packaging without touching the inside of the packaging material.
4. Securing the Packaging: Once the derma roller is inside the clean and sterile packaging, seal it immediately. If making use of a heat-sealed pouch, ensure the seal is full, safe, and secure. For plastic containers, ensure the lid fits firmly and is correctly closed.
5. Identifying the Plan: Plainly label the plan with vital information, such as the sterilization day, approach to sanitation, and expiration day. Appropriate labeling assists users determine the sterility status and guarantees they make use of the gadget within its safe duration.
6. Storing Packaged Derma Rollers: Shop the packaged derma rollers in a clean, completely dry atmosphere. Avoid subjecting them to extreme warmth, moisture, or straight sunshine, as these problems can compromise the product packaging’s honesty and the device’s sterility.
| Step | Action | Purpose |
|---|---|---|
| Picking Sterile Packaging Products | Choose sterile bags or containers | Maintain sterility of the derma roller |
| Wearing Sterile Gloves | Place on clean and sterile handwear covers prior to dealing with | Avoid contamination from hands |
| Making Use Of Sterilized Tools | Handle derma roller with sterile tweezers | Prevent direct contact with the tool |
| Sealing the Packaging | Seal the packaging safely | Make sure the sterility is maintained. |
| Labeling the Plan | Labels with sterilization and expiration dates | Give crucial information for individuals |
| Storing Packaged Derma Rollers | Shop in a clean, dry area | Preserve the honesty of the packaging |
By following these steps, you can guarantee that your derma roller will continue to be clean, sterile and secure for usage up until it is needed. Proper packaging not only secures the gadget but also gives self-confidence in its sanitation and preparedness for application.
FAQs about How to Sterilize Your Derma Roller Before Packaging
1. How important is it to prepare my workspace before sterilizing my derma roller?
Preparing your workspace is crucial to ensuring effective sterilization and minimizing the risk of contamination. A clean and organized environment is essential for maintaining hygiene standards.
2. What are the essential materials needed for sterilizing a derma roller?
Essential materials include isopropyl alcohol, hydrogen peroxide, boiling water, UV sterilizer, clean towels, and disposable gloves.
3. How do I select the appropriate sterilization method for my derma roller?
Consider the material of your derma roller and choose a method that aligns with the manufacturer’s recommendations. Common methods include chemical disinfectants, boiling water, and UV light.
4. Can I use isopropyl alcohol for sterilizing my derma roller?
Isopropyl alcohol is an effective sterilizing agent for derma rollers. Use a concentration of at least 70% and follow the proper steps for optimal results.
5. How can I sterilize my derma roller using hydrogen peroxide?
Sterilizing with hydrogen peroxide involves soaking the derma roller in a 3% solution for 10–15 minutes, rinsing it thoroughly, and air-drying it on a clean surface.
6. Is boiling water a reliable method for sterilizing derma rollers?
Boiling water is a reliable method for sterilizing derma rollers. Boil the roller for 10–15 minutes, ensuring it is fully submerged, and then air-dry it on a clean surface.
7. How can I use UV light to sterilize your derma roller?
UV light sterilization requires a dedicated UV sterilizer box. Clean the roller, place it in the box, expose it to UV light for the recommended time, and handle it with care after sterilization.
8. Why is it important to properly dry and handle the sterilized derma roller?
Proper drying prevents bacterial growth and maintains sterility. Use sterile cloths or air-dry the roller, avoid direct handling, and inspect for any residual moisture before packaging.
9. How should I package my sterilized derma roller safely?
Select sterile packaging materials, wear sterile gloves, use sterile tools, seal the package securely, label it with essential information, and store it in a clean, dry environment to maintain sterility.